
Currently Empty: £0.00


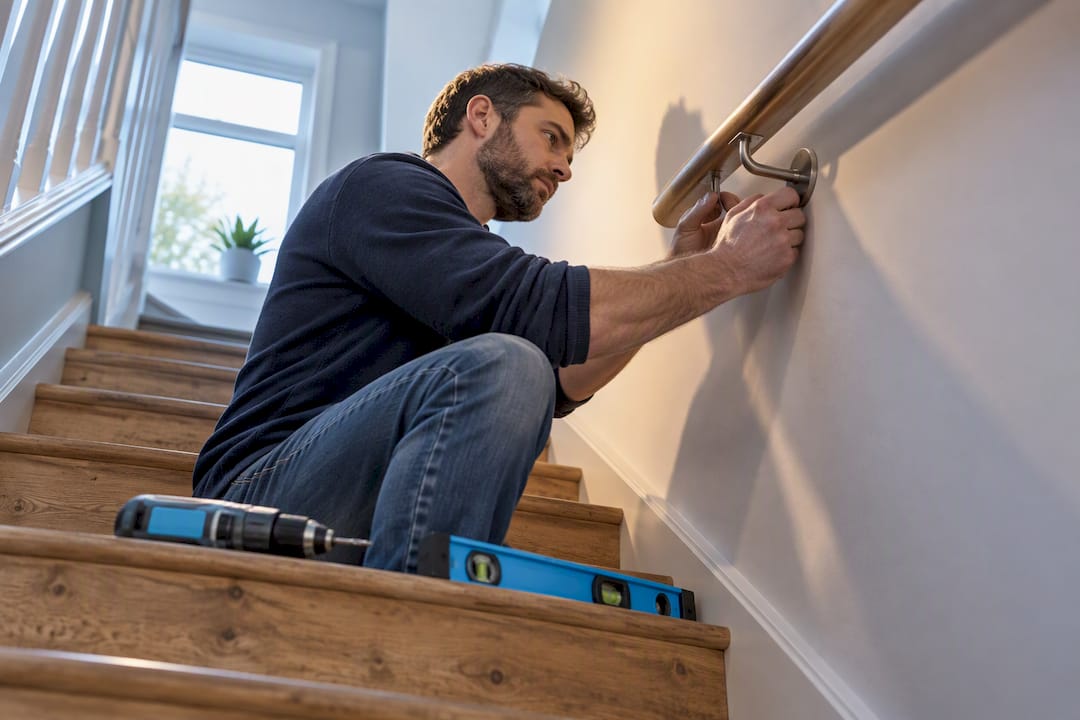
For most homes, a wall-mounted handrail fixed into studs or a timber backer is the simplest, strongest solution. Open-sided stairs need post-mounted or fascia brackets instead, external decks demand corrosion-rated hardware, and stairs used by young children usually need a second, lower rail fitted below the standard one. Get the substrate and bracket spacing right first; the style choices matter far less than what is holding the rail up.
TL;DR:
- Most home stair handrails should be wall-mounted into studs or timber backing for maximum strength, especially in high-traffic or load-bearing areas.
- Exterior or coastal installations require corrosion-resistant materials such as 316 stainless steel or galvanised steel, and regular inspections ensure safety and longevity.
- Correct bracket spacing, typically every 4 feet with end brackets within 6 to 12 inches, prevents flexing and maintains safety under load.
- Fixing into solid substrates like masonry or timber is crucial; relying on drywall anchors can cause failure and increase injury risk.
- Child-height rails need independent fixings, continuous runs, and proper positioning to provide safe, accessible grip at a naturally reachable height.
Table of Contents
- Handrail mounting options explained: fascia, top, core and post
- Bracket types, materials and finishes that actually hold
- How to attach a handrail to a wall, step by step
- Bracket spacing, rail height and graspability rules that matter
- Choosing the right mounting method: a practical checklist
- KiddieRail and child-height mounting: what it involves
- Installation tools and hardware you’ll actually need
- Maintenance and inspection tips for mounted handrails
- Accessibility beyond graspability: what ADA-style compliance actually adds
- Which wall type suits which mounting option?
- Installer perspective: the pitfalls that keep repeating
- Give your child their own handrail, fitted the right way
- Sources
- FAQ
Handrail mounting options explained: fascia, top, core and post
Every handrail mounting method boils down to where the load actually transfers. Fascia mounting fixes brackets to the vertical face of a stair stringer or fascia board, a common choice when the stringer is exposed and you want the rail to sit clear of the wall. Surface or top mounting attaches brackets to the top of a wall cap or newel, popular on masonry balustrade walls where drilling into the face isn’t practical. Core mounting sets a post or baluster directly into a drilled and grouted hole in concrete or stone, giving exceptional rigidity but requiring structural work that’s hard to reverse. Post-mounted systems use freestanding vertical posts anchored to the stair tread or floor, the standard approach for open-sided staircases with no adjacent wall.
Retrofit jobs usually favour wall-mounted brackets because they’re the least invasive and easiest to reverse. Open sides leave no real choice beyond post-mounted or a manufactured system such as glass or cable rail.
- Fascia mounts: strong, visually clean, need an exposed stringer face
- Top/surface mounts: quick to fit on masonry walls, limited to solid substrates
- Core mounts: the most rigid option, but permanent and labour-intensive
- Post-mounted systems: essential for open sides, need careful base fixing to resist leverage
Bracket types, materials and finishes that actually hold
Bracket style dictates how the rail fastens and how much load it can take before flexing. Saddle brackets cradle the rail from below and suit round profiles. Flange brackets bolt flat against the rail’s underside and work well with square or rectangular sections. Return-end brackets curve the rail back to the wall at terminations, closing off the ends so clothing or bag straps can’t catch.
Material choice depends almost entirely on exposure. Indoor rails do fine in 304 stainless or powder-coated mild steel. Anything outdoors, coastal, or in a damp stairwell should move to 316 stainless or hot-dip galvanised steel, since 316 resists chloride corrosion far better over time, according to Q-Railing’s installation notes. Some manufacturer systems use structural adhesive or Q-glue connectors instead of welding, a neat way to avoid heat distortion on polished finishes.
- Saddle brackets: round profiles, exposed fixing
- Flange brackets: flat profiles, higher load spread
- Concealed fixings: cleaner look, cost more, need precise drilling
- Rosette covers: hide wall damage and screw heads on renovation jobs
Pro Tip: If you’re matching a rail to existing timber joinery, ask your supplier for a colour-matched end cap rather than painting metal brackets. Paint chips faster than a factory finish and looks worse sooner.
How to attach a handrail to a wall, step by step
Getting the geometry right before you drill saves you from redoing the whole job.
- Mark the height at the top and bottom of the flight, then snap a chalk line between the two points to keep the rail dead straight along the pitch line.
- Locate your studs with a stud finder, or plan for a timber backer board if the run doesn’t line up with framing.
- Never rely on standard drywall anchors. Standard plastic anchors aren’t rated for sustained human bodyweight loads, which is exactly the kind of load a handrail sees every time someone leans or falls against it.
- Fit a backer board across multiple studs if you can’t hit solid timber at every bracket point, then fix brackets into that.
- Use through-bolts or heavy-duty structural toggles on masonry or hollow walls where studs simply aren’t an option.
- Fit the rail to the brackets, check it’s level and firmly seated, then test by applying firm downward and outward pressure before calling the job done.
Falls on stairs remain one of the most common causes of home injury, and a rail that shifts under load is often worse than no rail at all, because it gives a false sense of security at the exact moment someone needs it most.
The most common mistake is skipping the stud search altogether and trusting a single screw into plasterboard. The second most common is spacing brackets too far apart on a long run, letting the rail flex noticeably when someone puts real weight on it.
Bracket spacing, rail height and graspability rules that matter
Spacing and dimensions aren’t arbitrary. A widely used residential rule-of-thumb is one bracket roughly every 4 ft (1.2 m), with end brackets placed 6 to 12 inches from the rail terminations to stop the ends flexing or drooping. In the UK, Approved Document K sets handrail height at 900 to 1000 mm measured from the pitch line, and requires the rail to run continuously across flights and landings.
Graspability is where a lot of good-looking rails quietly fail. A rail can look substantial and still be impossible to grip properly if the profile is wrong.
| Profile type | Shape | Key dimension |
|---|---|---|
| Type I | Circular | 1¼ to 2 inches diameter |
| Type II | Non-circular | 4 to 6¼ inch perimeter, max 2¼ inch cross-section, finger recesses both sides |
Type I and Type II definitions exist because a flat, wide rail simply won’t let your hand close around it in a power grip, which is the entire point of having a handrail during a fall.
- Handrails and guards are governed by different rules: guard infill uses a 4-inch sphere test, with stair-specific exceptions of 4⅜ inches for sloped infill and 6 inches for the triangular gap at the tread and bottom rail
- Cable rail systems need tighter spacing than the nominal 4 inches allows, since cables deflect under load and can open the gap beyond the legal limit
Choosing the right mounting method: a practical checklist
Work through substrate, load and use before you pick a bracket style. Ask whether the wall is masonry, timber-framed or open air, whether the stairs see heavy daily traffic, and whether a child will be using the rail independently.
- Substrate: solid masonry allows top or core mounting; timber-framed walls need stud location or a backer board
- Traffic and load: communal or commercial stairs justify heavier fascia or post systems
- Child safety: a lower, independently fixed rail is worth adding alongside the standard one
- Indoors vs outdoors: outdoor and coastal settings call for 316 stainless or galvanised finishes
- DIY skill and tools: masonry drilling and structural toggle fixings are more forgiving of small errors than glass or cable systems
Post-mounted and manufactured systems like glass balustrades or cable rail suit open, architectural stairs but usually need a professional for accurate load calculations. Call a specialist whenever you’re dealing with a structural core mount, an unusually long unsupported span, or any load-bearing question you’re not confident answering yourself.
Pro Tip: If in doubt about your wall type, drill a small pilot hole first. Masonry dust means solid substrate; a hollow sound or drywall dust means you need a backer board before anything else.
KiddieRail and child-height mounting: what it involves
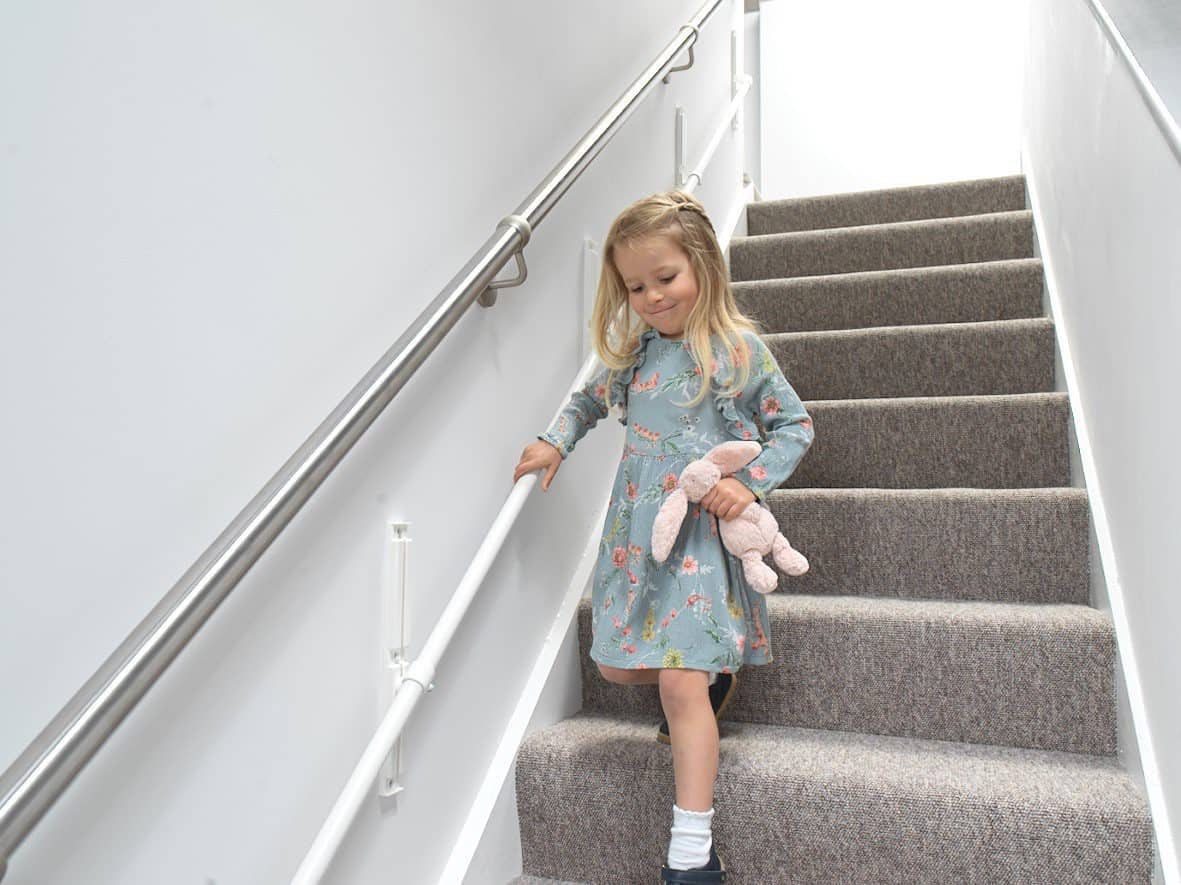
A child-height rail sits below the standard adult handrail, giving younger stair users their own grip at a reachable height rather than forcing them to reach up for a rail sized for adults. Because this lower rail carries its own load path, it needs independent fixings rather than piggybacking off the existing bracket screws.
Installers commonly fit the lower rail with its own dedicated brackets, keep the run continuous along the flight, and round off the terminations so nothing snags on clothing or bag straps as a child moves past.
- Choose bracket positions that clear the existing adult rail brackets to avoid weakening the same stud
- Keep the child rail continuous across the full flight, matching the logic behind Approved Document K’s continuity rule for adult rails
- Fit a timber backer where studs don’t align, exactly as you would for the main rail
- Check the KiddieRail range for adjustable options that grow with a child rather than needing full replacement later
Installation tools and hardware you’ll actually need
The toolkit changes depending on the mounting method, but a few items turn up on almost every job. A stud finder is non-negotiable for wall mounts, paired with a spirit level and a chalk line to keep the run straight over long flights. You’ll want a cordless drill with masonry and wood bits, a socket set for through-bolts, and a decent tape measure for marking bracket centres accurately.
For wall-mounted brackets into timber framing, coach screws or lag bolts rated for shear load are the standard fixing. Where studs aren’t available, heavy-duty structural toggle anchors or sleeve anchors rated for the wall type do the job in plasterboard or masonry, always sized to the manufacturer’s stated load rating rather than whatever happens to be in the toolbox.
Post-mounted systems need base plates, anchor bolts rated for the deck or tread substrate, and often a torque wrench to hit the manufacturer’s specified tightening figures. Core-mounted posts require a masonry core drill, structural grout or epoxy anchor compound, and enough curing time before any load is applied.
Fascia mounts typically use bracket sets supplied with matching screws, though swapping in stainless fixings is worth the small extra cost anywhere near moisture. For any adhesive or Q-glue connector system, follow the manufacturer’s surface preparation steps closely, since a rushed bond is the single most common cause of early failure on glued balustrades.
A basic pencil, spirit level and stud finder cover most retrofit jobs. Structural fixings and load-rated anchors matter more than having every specialist tool in the shed.
Maintenance and inspection tips for mounted handrails
A handrail that was solid on installation day won’t necessarily stay that way. Timber framing shrinks and swells with seasonal humidity, masonry anchors can loosen slightly under years of repeated flexing, and outdoor rails face weather that indoor ones never see.
Check bracket tightness twice a year at minimum, more often on outdoor or heavily used stairs. Grip the rail firmly and try to rock it side to side and up and down; any noticeable movement means a bracket has worked loose and needs re-tightening or, in some cases, re-anchoring into fresh substrate.
Look closely at the fixing points themselves, not just the rail. Hairline cracks in plaster around a bracket, rust staining on screw heads, or a slightly proud bracket plate are early warning signs worth acting on before they become a failure.
Outdoor and coastal installations need closer attention to corrosion. Even 316 stainless benefits from an occasional wash with mild soapy water to remove salt deposits and grime that can accelerate pitting over time. Galvanised steel should be checked for scratches through the zinc coating, since exposed steel underneath rusts quickly once the sacrificial layer is breached.
Wooden rails and backer boards deserve a visual check for rot, especially at the base of external posts where water tends to pool. A screwdriver tip pressed into the timber tells you quickly whether it’s still sound or has started to soften.
Any rail installed for a child should be checked more frequently than an adult rail, simply because it takes more varied and unpredictable loads from a growing child learning to use stairs confidently.
Accessibility beyond graspability: what ADA-style compliance actually adds
Graspability covers grip, but accessible design asks more of a handrail than shape alone. ADA and IRC guidance specifies gripping diameters of roughly 1¼ to 1½ inches, tighter than the general Type I range, because a smaller diameter suits a wider range of hand sizes and grip strengths, including users with limited hand mobility.
Clearance from the wall matters just as much as the rail itself. The same guidance calls for around 1½ inches of clearance behind the rail, enough space for knuckles to pass without scraping the wall during a firm grip, a detail that’s easy to overlook when a bracket gets fitted flush against the surface for a neater look.
Extensions at the top and bottom of a flight are another accessibility feature that goes beyond basic dimensional compliance. A rail that stops exactly where the stairs stop offers no support during the transition onto level ground, which is often the exact moment someone loses balance. Extending the rail horizontally past the last riser gives a hand something to hold onto through that transition.
Continuous, uninterrupted runs across landings matter for the same reason mid-flight breaks in grip force a hand to let go and reach again, a genuine hazard for anyone with reduced strength or coordination. None of this shows up if you only check rail diameter against a code table. Full accessibility means checking clearance, extension length and continuity together, not treating graspability as the only box to tick.
Which wall type suits which mounting option?
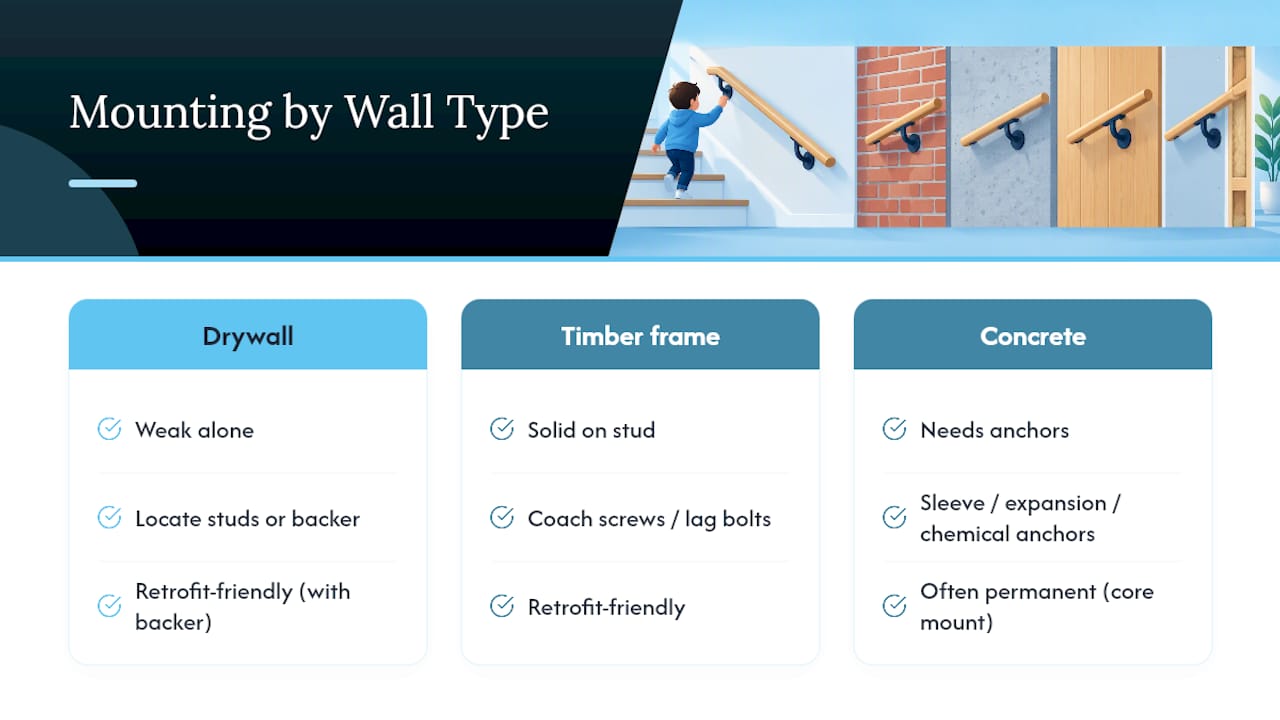
Drywall alone, without backing, can’t take a handrail’s load safely regardless of anchor type; the plasterboard itself will eventually crack or pull away under repeated stress. The fix is either locating studs behind the drywall or fitting a timber backer board across several studs, a detail that solves most retrofit substrate problems in one move.
Timber-framed walls are the easiest substrate once you’ve found the studs, since coach screws or lag bolts driven into solid wood give reliable, long-lasting holding power. The main risk is missing the stud centre and winding up in the gap between framing members, which is exactly what a stud finder and a bit of patience prevents.
Concrete and masonry walls need a different approach entirely. Sleeve anchors, expansion bolts or chemical anchors set into drilled holes provide the holding power, with the anchor size and embedment depth matched to the wall’s actual load rating rather than guessed at. Core mounting, drilling a hole and grouting a post directly into concrete, sits at the strongest end of this scale but is effectively permanent once cured.
If you’re prepping a wall for any of these fixings, the groundwork often overlaps with other interior carpentry work, and the same principles around solid backing and precise measurement apply whether you’re fitting a door frame or a handrail bracket.
Installer perspective: the pitfalls that keep repeating
Most call-backs trace to two things: brackets fixed into thin air behind plasterboard, and spacing stretched too far on a long run to save a few screws. A timber backer board and the right fastener for the wall solve both before they start. Test every fixing with real weight before you trust it.
— Paul
Give your child their own handrail, fitted the right way
Everything above assumes an adult-height rail, but children on stairs need a grip at their own level, not a reach up to yours. The KiddieRail Adjustable Child Stair Handrail fits below a standard rail on any staircase layout and adjusts as your child grows, so you’re not buying a new rail every couple of years the way you would with a fixed-length alternative.

Measure your stair run before you order. Standard flights suit the main handrail on its own, but longer runs need extra length: the 170cm Extension Pack covers longer flights, while the 85cm Extension Pack suits stairs that just need a little more coverage. Extension packs are priced from £24.99 to £36.99 one-off, depending on length. Check the full accessories range to match the pack to your flight, or browse the complete shop to see the current lineup before you measure up.
Sources
- Approved Document K: Protection from falling, collision and impact (extracts on handrails)
- Type I & II handrail profile requirements
- Putting up a handrail: bracket spacing, code rules & DIY guide
- Guard opening limitations and the 4‑inch sphere rule
FAQ
What are the different types of handrail brackets?
The main types are saddle brackets, which cradle round rails from underneath; flange brackets, which bolt flat against square or rectangular profiles; and return-end brackets, which curve the rail back to the wall at terminations. Choice depends on rail shape and whether you want a concealed or visible fixing.
What are the regulations for handrails in the UK?
Approved Document K sets handrail height at 900 to 1000 mm from the pitch line and requires continuous rails across flights and landings. It also gives recommended profile dimensions so the rail remains graspable.
How do I attach a handrail to a wall?
Mark the height, snap a chalk line, and locate studs with a stud finder, fitting a timber backer board across multiple studs if the run doesn’t align with framing. Fix brackets with coach screws into solid timber, or structural toggle anchors and sleeve anchors on masonry, never standard drywall anchors.
What is the 4-inch sphere rule for railing?
The 4-inch sphere rule limits guard infill openings so a 4-inch sphere can’t pass through, preventing small children slipping through gaps. Stairs carry specific exceptions of 4⅜ inches for sloped infill and 6 inches for the triangular gap at the tread and bottom rail, and cable systems need tighter spacing to allow for deflection under load.
How far apart should handrail brackets be spaced?
A common residential rule-of-thumb is one bracket roughly every 4 ft (1.2 m), with end brackets placed 6 to 12 inches from the rail terminations. Longer or heavily used runs may need closer spacing to control flex.
Does KiddieRail fit alongside my existing handrail?
Yes, the KiddieRail Adjustable Child Stair Handrail is designed to fit below a standard adult handrail on any staircase layout, using its own independent fixings. It adjusts as your child grows, and extension packs are available for longer stair runs.


